 BBZ Image Tools
Learn the workflow
From your first photo
to a finished catalog.
Choose a product in the sidebar, then follow the steps. Use one tool on its own or combine all three for your auction photo workflow.
Choose the right tool
Image credits and catalog lots
The local desktop tools are free and do not require an account. The online tools require sign-in.
Catalog Builder: one catalog lot per lot written. Uploading photos alone does not use catalog lots. New accounts get 50 free catalog lots.
These are separate balances. Buy image credits for backgrounds or add catalog lots for descriptions. Before a redo, check the button: it identifies a free redo when available.
Desktop tool: download & install
Download the installer
Visit Download and choose Download for Windows. The desktop tool supports 64-bit Windows 10 and 11.
Run setup
Open the downloaded installer and follow its prompts. The installer includes its runtime; you do not need a separate Python installation.
Open the app
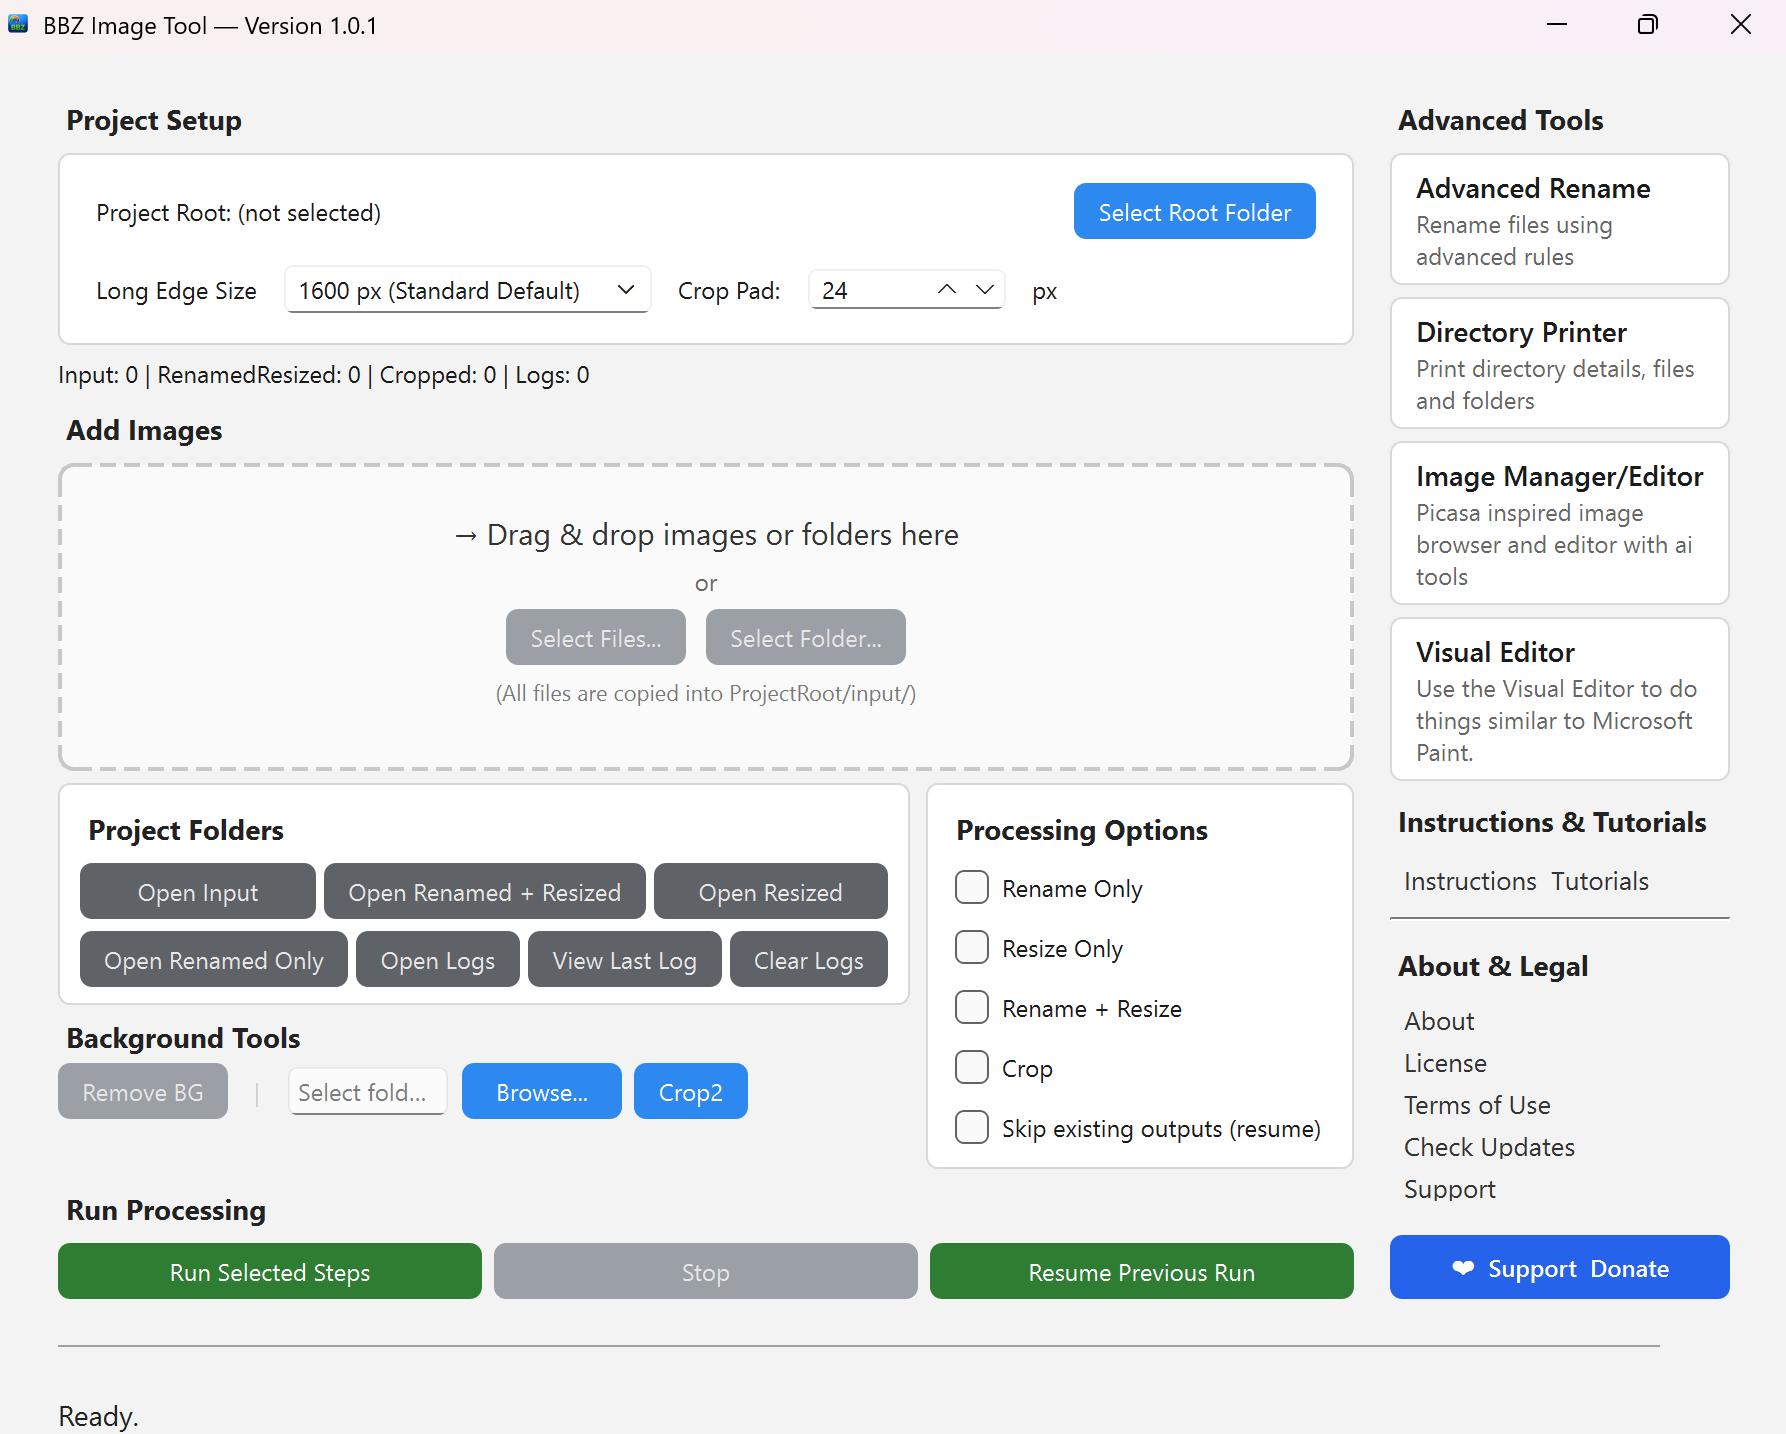
Launch BBZ Image Tool. Keep your original photos in a separate folder and use copies for your first batch.
Prepare your photo folder
Keep each lot together
Photograph the whole item first, then details, labels, condition and accessories. Keep all photographs for one lot together.
Make a working copy
Copy your photos into a separate working folder. Keep original camera files unchanged.
Check order and clarity
Browse the folder in Image Manager or Viewer & Editor. Confirm each item is complete and that labels and condition are visible.
Rename a batch
Choose your naming convention
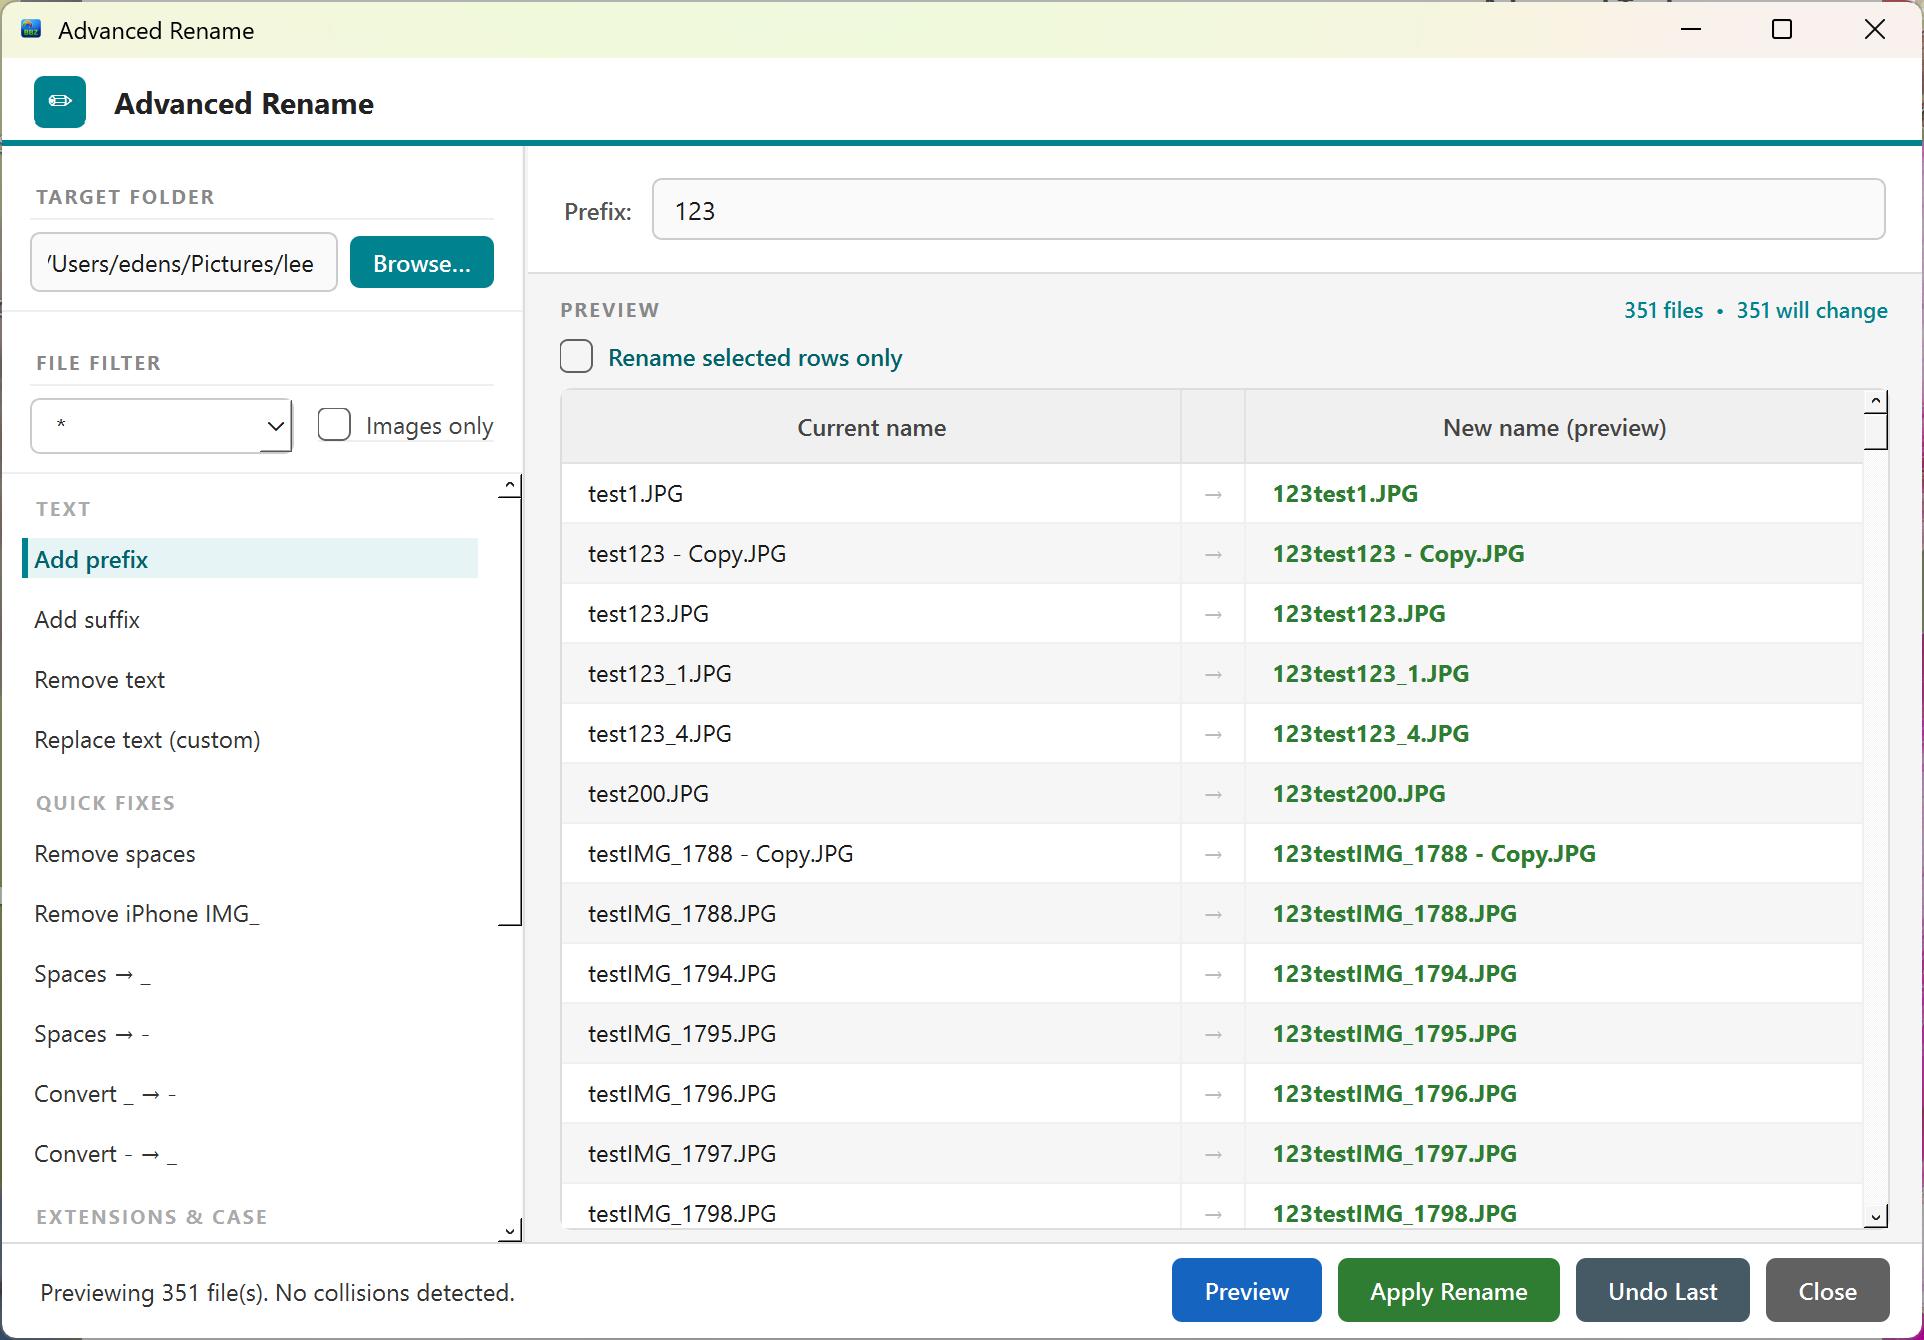
Decide on lot numbers and a photo sequence before processing. For the catalog builder, use names such as 101_1.jpg, 101_2.jpg and 102_1.jpg.
Preview a small group
Open Advanced Rename and set your naming options. Check the preview for unique filenames and the correct order, including a lot with several photos.
Apply and verify
Apply the rename to your working copies. Open the resulting files and confirm the pictures still belong to the correct lots before processing the whole folder.
Resize, crop & convert
Choose the task
Use the desktop tool's resize, crop or format conversion tools for the photos you want to prepare.
Try a sample
Choose dimensions and output format appropriate for your auction software or listing. Keep small marks legible and avoid cropping out parts of the item.
Inspect the output
Open the processed sample at full size. Once the result looks right, process the rest of your working folder.
Background removal: sign in & upload
Open background removal
Open Background Removal and sign in or create an account. Check your image-credit balance.
Select your images
Drag photos into the upload area or select them from your computer. Supported formats are JPG, PNG and WebP, with a maximum of 25 MB per image and 50 images per batch.
Check the list
Remove any unwanted files before processing. Ensure your image-credit balance covers the number selected.
Remove backgrounds
Start the batch
Select Remove backgrounds. The page shows the number of image credits needed.
Wait for processing
Watch the progress indicator. Big batches are finished in the background and we email you a download link.
Check completion
Review the finished results and any errors. If a batch fails, check your balance and History before resubmitting the whole batch.
Review & download your images
Inspect the outline
Check handles, thin edges, glass, reflective surfaces and gaps between parts. Make sure the object and its condition remain accurate.
Save the results
Use Download PNG for an individual result or Download all as ZIP when offered. PNG results have transparent backgrounds; the checkerboard represents empty space.
Keep a local copy
Download results promptly. The page states files are stored for seven days; use History to find available downloads during that period.
Catalog Builder: 1. Set up
Open the Catalog Builder
Sign in and open the Catalog Builder. Check your catalog-lot balance, then click Step 1, Set up. You only do this once.
Choose your defaults
Set photos per lot, maximum title and description lengths, starting-bid rules, shipping default and AI model.
Set your house style
Review Writing rules and Categories. You can load a categories CSV or edit the category list. Review Download file columns if your auction software needs specific headings.
Save your settings
Categories save as soon as you load them. For everything else, including writing rules and columns, click Save at the bottom of the page. Then continue to Step 2, Upload photos.
2. Upload photos
The builder groups photos using their filenames. Choose one of the supported patterns before uploading.
Numbered photos
101_1.jpg
101_2.jpg
102_1.jpg
101_m.jpg
103_1@101c.jpg
The first number identifies the lot. The final number gives the image sequence. Use 101_m.jpg for a measurement photo of lot 101. Add a consignor code after an @ sign: 103_1@101c.jpg is lot 103 for consignor 101c.
Camera names with slate photos
IMG_1001-101.jpg
IMG_1002.jpg
IMG_1003.jpg
IMG_1004-102@101c.jpg
The first file is a slate for lot 101. Following photos belong to that lot until the next slate. The last example starts lot 102 with consignor code 101c.
Name the sale
Open Upload photos and enter a sale name.
Choose the folder
Drag in a photo folder, use Choose folder or select individual photos with Choose photos. Supported files are JPG, JPEG, PNG and WebP.
Check grouping
Inspect the lot list, photo counts and measurement indicators. If lot numbers look wrong, switch between numbered and slate modes. Lots without item photos are skipped.
Choose when the AI starts
Leave 'Have the AI start writing' checked to start right away. Uncheck it if you want to upload now and start writing later from the sale's page.
Upload
Select Upload and wait for completion. Large camera images are shrunk before upload. If any photos fail, follow the batch notice and add the missing photos again.
3. Review & download
Start or monitor writing
Open your batch. If you did not start the AI during upload, click Write catalog. Check that enough catalog lots are available.
Review every draft
Check lot number, consignor, title, description, category, value, starting bid and shipping. Verify quantities, measurements and condition against the actual item.
Edit and confirm saving
Type corrections in the fields. Changes save automatically when you leave the edited field; watch for errors before leaving the page.
Approve the reviewed lots
Use Approve on a checked lot. Approve all ready only after you have reviewed those lots. Use Undo approve to return a lot to review when needed.
Download your finished catalog
Choose your CSV
Open Download on the batch page. Choose approved lots only for a reviewed export, all written lots if needed, or the CSV with every field.
Download the photos
Choose Numbered photos (ZIP file) while photos are available. Save both the CSV and ZIP locally. Catalog photos are kept for 30 days after upload, so download the ZIP before then.
Test the import
Import a small sample into your auction software. Check column mapping, lot numbers, titles and photo associations before importing the entire sale.
Common questions
My catalog lots are grouped incorrectly.
Check the filenames and selected grouping mode. Use the examples above and inspect the upload preview before continuing. Correct your working copies if a photo belongs to the wrong lot.
I have image credits but cannot write catalog lots.
Image credits pay for background removal. The Catalog Builder uses a separate balance of catalog lots. Visit Catalog lots.
My catalog changes did not save.
On the review page, click out of the field you edited; it saves by itself. Watch for an error message. On the settings page, click Save at the bottom; only categories save on their own.
I cannot sign in or find a download.
Use Forgot password for account access. For backgrounds, check History and your email while the files remain available. For catalog exports, reopen the batch and use Download.
Need a hand with your next step?
Tell support which product you are using, the step you reached and the exact error. Include a screenshot when it helps.
Contact support ↗Read workflow articles ↗